How To Create Jelly Sandwich Nails
•Posted on August 29 2022

Hey Beauties!
Let’s talk about jelly sandwiches. No, not the peanut butter and jelly sandwiches that you eat, but the nail polish sandwiches you create for your manicures! Next to a skittle manicure, this is one of my favorite nail art techniques.
Process:
So, what is a jelly sandwich if we aren’t talking about food?
A jelly sandwich is an easy nail art technique in which you alternate the application of jelly type nail polishes and glitter toppers. The basic technique boils down to applying a jelly nail polish to your fingernail and once dry, applying your glitter topper. Allow to dry and after that, finish with another layer of your jelly nail polish. Basically, you create a “sandwich” effect with nail polishes. Think of the jelly nail polish as the “bread” of your sandwich and the glitter topper as your “peanut butter and jelly” or sandwich filling. Essentially, You sandwich the glitter between two polishes.
Jelly nail polishes are an absolute must to create this look. If you are using a nail polish that is too thick or too opaque, you will not be able to see the glitter through the nail polish. Jelly nail polishes are formulated to be more transparent and most often they will not become fully opaque on the nails no matter how many coats of nail polish you apply. They also tend to have a very squishy or plump consistency to them and once dry, are usually very glossy even without a top coat.
The second part of this equation is the glitter topper. A nail polish topper is a clear base nail polish that has different effect pigments added to it. This could be glitters, flakies, or shards. We call them toppers, because typically, you apply them over a creme nail polish to “top” them and add a different look to the manicure. The clear base means that you will see the underlying creme polish without affecting the original color and the effect elements add sparkle, iridescence or multi-chrome qualities to an otherwise plain polish.
While you can use any topper that you like, I personally prefer to use toppers that are glitter based and are either holographic or iridescent in nature. I find that these show up the best. Multichrome flakie or glitter toppers will work too, but they just aren’t my preference for jelly sandwiches. I prefer my jelly sandwiches to sparkle instead of shift colors. If you want a really different look, try a matte glitter topper!
Benefits:

You may be asking yourself, “Why do a jelly sandwich?" "Why not just stop at the topper?" "Do I really need that second layer of jelly nail polish after the topper?” And the answers in the same order are, because it’s fun, because that’s boring and absolutely, yes! Let me explain.
Sure, jelly sandwiches are a nail art technique, but they are so much more than that. You know how when you apply a really chunky glitter polish or a really dense glitter polish, your nails dry down to a bumpy or textured surface? Sometimes even after applying a top coat? Well, a jelly sandwich will help out with that! By applying that second layer of jelly nail polish over your topper, you give it a cushion or a little extra padding to help smooth out the texture of the glitter. And while you can stop there since jelly nail polishes dry to a glossy finish, I still recommend topping with a glossy top coat just to ensure a longer wear time.
Jelly sandwiches can also help to reduce “Visible Nail Line” or VNL. VNL is when you can still see your nail line (the hyponychium or the part under the nail where your skin separates from the nail bed) even after applying a nail polish. As stated above, most jelly nail polishes never become fully opaque on the nails even if you apply 4 coats of nail polish. And I’m not saying you won’t have any visible nail line at all, but I find that jelly sandwiches do soften it more than applying jelly nail polishes alone. I think it has to do with having that extra layer of glitter nail polish in the middle which helps create space between the two jelly layers, giving the nail line more of a blurred look.

If you are someone who likes glitter and sparkle but maybe doesn’t want it to be too in your face, a jelly sandwich can help with that also! Since you are applying a second layer of jelly nail polish over a glitter topper, it tones down the sparkle just a smidge. Don’t worry glitter lovers, you will still get plenty of sparkle, but I find that it looks more like a subdued inner sparkle as opposed to a bright bling-y sparkle.
Which brings me to my next point. Jelly sandwiches look to me like encapsulated glitter. I had a dance instructor one time who always had french tip acrylic nails. But they weren’t your average white french tip manicures. She always had the tips done in different colors of glitter. A set that I found to be particularly pretty was one that she had done in red glitter tips. It looked like she had Dorothy’s shoes from the Wizard of Oz on her nails! As someone who does not get acrylics or wear any type of fake nails, I find that jelly sandwiches are the closest I can get to having that encapsulated glitter look that comes with acrylic nails. No, it’s not exact by any means, but it does carry a similar feeling to it. Regardless, I love the look of glitter seeming to be suspended in a translucent jelly-like substance that enhances its reflective qualities.
While nail art techniques inherently bring out the creativity in each of us, jelly sandwiches really expand the possibilities. With BLUSH Lacquers, I mix and create nail polishes and sell them as one complete polish. But, creating a jelly sandwich manicure is like a deconstructed version of that. You’ve got your base colors (jelly nail polish) and you’ve got your effect pigments (glitter toppers) and literally the combinations are endless. You can essentially customize your jelly sandwich into a million different looks.

I sat down to photograph some color combinations today without much of a plan on what I was going to pair with what and once I got started trying out different combinations, I almost couldn’t quit! It was addicting! I was like, what about this and this? And then I started getting really crazy and using different bottom and top jelly polishes and I literally had to make myself stop because I wouldn’t have gotten anything else done today if I hadn’t. But, the point is, you get to be the creator with the jelly sandwich technique and it’s highly satisfying.
One last pro to the jelly sandwich technique is that it helps to expand your nail polish collection without physically expanding your nail polish collection. Basically you can create more looks with less polishes. You thrifty ladies out there, you’ll love this one! Jelly nail polishes can be worn alone or mix and matched with other jelly polishes for a myriad number of colors. Glitter toppers can be worn alone or with a jelly nail polish for a jelly sandwich. Toppers can be used over opaque polishes and guess what? Jelly nail polishes can be worn over opaque polishes too! You can tint your other nail polishes with a jelly nail polish (post coming soon!). Jelly nail polishes and glitter toppers are so versatile in their manicure and nail art applications that they alone can up your manicure looks by ten times easily. And you didn’t even have to buy another polish! How cool is that? In fact, you’ve gotten to create one!
Application:
Now that you’ve got the jelly nail polish fever, let me inspire you with some fun jelly sandwich combinations!
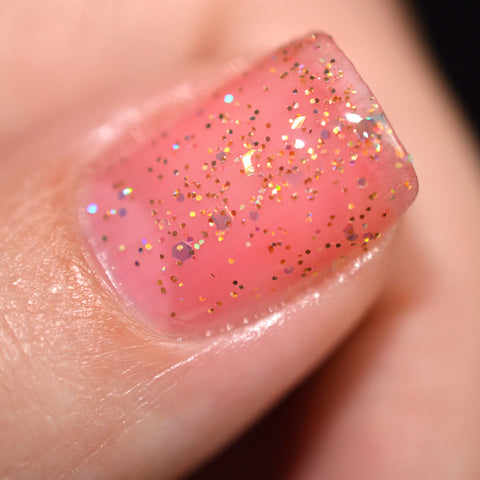
1. ‘Raspberry Rays’ + ‘Sundrop’

This lovely combination of pink and gold is both feminine and fun! Quick and easy, this is one of my go-to summer looks.
Get This Look!
-Apply 1 coat of ‘Raspberry Rays’ to all fingernails and let dry.
-Apply 1 coat of ‘Sundrop’ to all fingernails and let dry.
-Apply 1 coat of ‘Raspberry Rays’ to all fingernails and let dry.
-Finish with a glossy top coat.
2. ‘Turquoise Seas’ + ‘Mermaid Scales’

While this mani follows a similar process as the above one, but with different colors, I applied the glitter in a different way! ‘Mermaid Scales’ is a bit of a sparse glitter and I wanted to see more of the glitter for this mani. So, here’s a pro tip! Apply the glitter topper to your nails with a sponge instead of the nail polish brush. See our tutorial here! By doing this, I was able to get more glitter on my nails without having to add a bunch of bulky layers of nail polish to my manicure.
Get This Look!
-Apply 1 coat of ‘Turquoise Seas’ to all fingernails and let dry.
-Apply 1 coat of ‘Mermaid Scales’ with a sponge to all fingernails and let dry.
-Apply 1 coat of ‘Turquoise Seas’ to all fingernails and let dry.
-Finish with a glossy top coat.
3. ‘Dark And Stormy’ + ‘Periwinkle Party Popper’ + ‘Islamorada’

And this is where the crazy started to happen. I was no longer satisfied with pairing just one jelly nail polish with just one glitter topper. No, I had to have one jelly nail polish for the bottom layer, a glitter topper and then a different jelly nail polish for the top layer. This came out as a very beautiful monochrome mani. I could have just done ‘Dark and Stormy’ with ‘Periwinkle Party Popper’, but by adding ‘Islamorada’ to the top, it toned down the purple a little and I was left with a lovely darker blue-violet hue.
Get This Look!
-Apply 1 coat of ‘Dark and Stormy’ to all fingernails and let dry.
-Apply 1 coat of ‘Periwinkle Party Popper’ to all fingernails and let dry.
-Apply 1 coat of ‘Islamorada’ to all fingernails and let dry.
-Finish with a glossy top coat.
4. ‘Tropical Rum Punch’ + ‘Sundrop’ + ‘Periwinkle Party Popper’

But, I didn’t stop there. After realizing that I could have different colors for the top and bottom jelly layers I thought, but what about the glitter? Why not have two different layers of glitter? And that’s how I ended up with this lovely combo of ‘Sundrop’ and ‘Periwinkle Party Popper’ nestled between two layers of ‘Tropical Rum Punch’. This manicure also showed me that ‘Tropical Rum Punch’ is my perfect blurring nail line base color and would make for an excellent french tip manicure. I haven’t tried it out yet, but there will probably be a blog post…
Get This Look!
-Apply 1 coat of ‘Tropical Rum Punch’ to all fingernails and let dry.
-Apply 1 coat of ‘Sundrop’ to all fingernails and let dry.
-Apply 1 coat of ‘Periwinkle Party Popper’ to all fingernails and let dry.
-Apply 1 coat of ‘Tropical Rum Punch’ to all fingernails and let dry.
-Finish with a glossy top coat.
By the way, you don’t know how hard it was to stop there. Immediately after this manicure, I had what I think is the most ingenious idea ever. What if you had one color of a jelly nail polish for your bottom layer, then added two different glitter toppers in the middle and finished it off with a different color top layer jelly polish. I had to stop because I was getting out of control, but somebody needs to try this! Leave a comment, email me, tag us on instagram, I need to see this happen! (Bonus points if you use BLUSH nail polishes to create it!)
Read more of our ‘How To’ series:
How To Create Easy Jelly Horizontal Gradient Nails
How To Create Easy Jelly Rainbow Vertical Gradient Nails
How To Apply Flakie Toppers: 2 Ways!
How To Apply 'Matterial Girl' Matte Top Coat In An Icy Winter Mani!
Comments
0 Comments
Leave a Comment